
안녕하세요 😉
유유자적한 개발자 유로띠 입니다 😀
이번 포스팅에서는
✅ 스프링(Spring) 이란?
✅ 스프링(Spring)의 특징
✅ Spring과 SpringBoot의 차이점
에 대해 알아보겠습니다
🎉 스프링(Spring)과 스프링 부트(Spring Boot)의 차이점
📢스프링(Spring) 이란?
스프링(Spring)의 정확한 명칭은 스프링 프레임워크(Spring Framework)입니다
이름도 멋진 이 스프링(Spring)이란 이름은 어떻게 태어났을까요?
Whatever happened next, the framework needed a name. In the book it was referred to as the “Interface21 framework” (at that point it used com.interface21 package names), but that was not a name to inspire a community. Fortunately Yann stepped up with a suggestion: “Spring”. His reasoning was association with nature (having noticed that I'd trekked to Everest Base Camp in 2000); and the fact that Spring represented a fresh start after the “winter” of traditional J2EE. We recognized the simplicity and elegance of this name, and quickly agreed on it.
다들 해석하시겠지만😉
기존의 J2EE의 "겨울"로부터 새로운 시작의 "봄"이 왔다고 합니다 👍
Spring Framework: The Origins of a Project and a Name
📢스프링(Spring)의 특징
스프링의 가장 큰 특징은 아마도
제어의 역전(IOC)
의존성 주입(DI)
관점 지향 프로그래밍(AOP)
이렇게 3가지가 아닐까 싶습니다.
이런 특징으로 인해 결합도를 낮춰(Loose coupling)
유연한 개발이 가능해졌습니다.
그럼 특징들을
하나하나씩 살펴보겠습니다.😊
✅ 제어의 역전(IOC : Inversion of Control)
제어의 역전 패턴이 인기를 끄는 이유는 프로그램의 생명주기에 대한 제어권이 웹 애플리케이션 컨테이너에 있기 때문입니다.
즉, 사용자가 직접 new 연산자를 통해 인스턴스를 생성하고 메서드를 호출하는 일련의 생명주기에 대한 작업들을 스프링에 위임할 수 있게 되는 것입니다.
IOC는 직관적이지 못하기 때문에 IOC를 구현하는 방법으로는 의존성 주입(DI)이 있습니다.
✅ 의존성 주입(DI : Dependency Injection)
객체 사이에 필요한 의존 관계에 대해서 스프링 컨테이너가 자동으로 연결해 주는 것을 말합니다
스프링 컨테이너는 DI를 이용하여 빈(Bean) 객체를 관리하며, 스프링 컨테이너에 클래스를 등록하면 스프링이 클래스의 인스턴스를 관리해 줍니다
의존성이란 무엇일까요❓🤔
간단히 생각하면 스마트폰을 사용하기 위해서는 배터리가 필요합니다. 배터리가 없으면 스마트폰은 사용할 수 없죠. 즉 스마트폰은 배터리에 의존한다고 보면 됩니다. 만약 그 배터리가 스마트폰과 일체형으로 되어있으면 어떤가요?
배터리 교체를 하기 위해선 분리형과 비교해서 가볍게 바꿀 수가 없겠죠?

이러한 의존성에 대해서 느슨한 결합이 필요하고 의존성을 주입받아 사용받을 필요성이 있게 되는 겁니다.
스프링 컨테이너에 빈(Bean)을 등록하고 설정하는 방법은 크게 두 가지가 있습니다
1️⃣ XML 설정을 통한 DI
2️⃣ 어노테이션(Annotations)을 이용한 DI
첫 번째로 XML 설정을 통한 DI에 대해서 알아보도록 하겠습니다. 😉
🔴 XML 설정을 통한 DI
📍 applicationContext.xml
<?xml version="1.0" encoding="UTF-8"?>
<beans xmlns="http://www.springframework.org/schema/beans"
	   xmlns:xsi="http://www.w3.org/2001/XMLSchema-instance"
	   xsi:schemaLocation="http://www.springframework.org/schema/beans
			            http://www.springframework.org/schema/beans/spring-beans-4.0.xsd">


	<bean id="UserAddController" class="com.lotts.web.user.UserAddController">
		<property name="userImpl" ref="userImpl"/>
	</bean>

	<bean id="userImpl" class="com.lotts.domain.logic.UserImpl">
		<property name="userDao" ref="userDao"/>
		<property name="orgDao" ref="orgDao"/>
		<property name="uploadpath" value="${file.upload.path}" />
	</bean>

    <bean id="userDao" class="com.lotts.dao.ibatis.SqlMapUserDao">
		<property name="sqlMapClient" ref="sqlMapClient"/>
	</bean>

    <bean id="OrgDao" class="com.lotts.dao.ibatis.SqlMapOrgDao">
		<property name="sqlMapClient" ref="sqlMapClient"/>
	</bean>

    <bean id="sqlMapClient" class="org.springframework.orm.ibatis.SqlMapClientFactoryBean">
		<property name="configLocation" value="WEB-INF/config/SqlMap.xml"/>
		<property name="dataSource" ref="dataSource"/>
	</bean>
아래의 내용은 실무에 사용 중인 내용을 약간 변경하여 작성해 보았습니다
실제론 작동되지 않고 참고용으로 봐주시면 됩니다
1라인부터 5라인까지는 파일 자체를 위한 내용이며, bean 태그를 사용하기 위한 선언입니다
UserAddController는 사용자를 등록하는 컨트롤러이며 클래스인 userImpl를 ref태그를 사용하여 명시하였습니다.
userImpl는 사용자 구현체 클래스이며 해당 클래스는 인터페이스인 userDao는 ref 태그를 사용하여 명시할 수 있습니다.
각각의 userDao, orgDao 인터페이스는 sql을 위한 인터페이스인 sqlMapClient를 명시하였습니다.
📍 SpringTest.java
public class SpringTest {
	public static void main(String ar[]) {

    	ApplicationContext context = new ClassPathXmlApplicationContext("ApplicationContext.xml");

        UserFacade userImpl = (UserImpl) ctx.getBean("userImpl");


        userImpl.사용자_정보를_조회한다();
        userImpl.사용자를_등록한다();

    }


}
UserFacade 인터페이스에서 구현한 기능을 사용할 수가 있습니다.
소스를 수정하지 않아도 xml의 환경설정만으로 프로그램을 제어할 수 있게 되었습니다.
🔴 어노테이션(Annotations)을 이용한 DI
@Component를 사용하여 해당 클래스를 찾아 @Autowired가 붙은 클래스를 자동적으로 객체로 만들어주고 사용할 수 있게 해 줍니다.
또한, XML에 설정에 auto scan을 설정하면 해당 패키지 범위에 Component를 설정하여 사용할 수 있습니다.
<context:component-scan base-package="com.lotts.web" />
@Component의 확장된 어노테이션을 사용하면 스프링은 패키지 및 하위 패키지 내에서 해당 어노테이션을 찾아서 인젝션을 합니다.
🟢@Repository - 데이터베이스에서 정보를 검색하는 DAO(Data Access Objects)에 사용됩니다.
🟢@Service - 서비스 계층 클래스에 사용되며 데이터 및 비즈니스 로직 처리에 사용됩니다.
🟢@Controller - UI에서 요청 처리에 사용됩니다.
@Controller
public class InfoController extends MultiActionController{

	@Autowired
	private InfoServiceImpl InfoService;

}

@Service("InfoService")
public class InfoServiceImpl implements InfoService{

	@Autowired
	private InfoDaoImpl InfoDao;
}

@Repository("InfoDao")
public class InfoDaoImpl implements InfoDao {

	@Autowired
	private SqlSessionTemplate sst;

}
📢Spring과 Spring Boot의 차이점
앞에서 설명한 것처럼 스프링은 IOC나 DI를 통해
의존성을 주입할 수 있기 때문에 다양한 스프링 모듈을 사용할 수 있습니다.
✅ Spring module
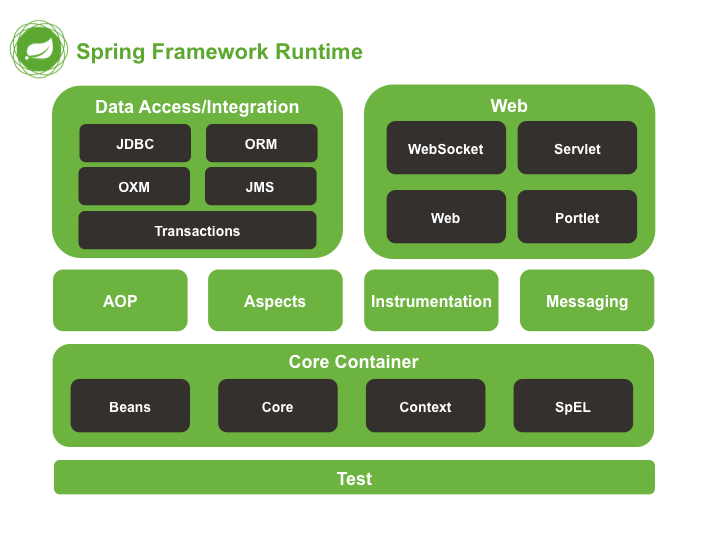
Spring MVC 프레임워크를 사용할 때 위에 applicationContext.xml이외의 다양한 설정을 통해 의존성을 주입합니다.
Spring MVC는 DispatcherServlet, View Resolver, Interceptor, Handler, View 등으로 구성되어있으며 아래의 설정은 실무에서 약간씩 가져온 대략적인 설정입니다.
📍 web.xml
DispatcherServlet 클래스를 등록하고, url-pattern 태그에서는 요청에 대해서 응답받을 수 있도록 설정합니다.
또한, 인코딩 타입이나 log4j 등을 설정합니다.
	<context-param>
    	<param-name>contextConfigLocation</param-name>
    	<param-value>
            /WEB-INF/conf/applicationContext.xml
            /WEB-INF/conf/DataAccessContext.xml
        </param-value>
  	</context-param>

  	<listener>
    	<listener-class>org.springframework.web.util.Log4jConfigListener</listener-class>
  	</listener>

    <filter>
    	<filter-name>encodingFilter</filter-name>
    	<filter-class>org.springframework.web.filter.CharacterEncodingFilter</filter-class>
    	<init-param>
      		<param-name>encoding</param-name>
      		<param-value>utf-8</param-value>
    	</init-param>
  	</filter>

  	<filter-mapping>
    	<filter-name>encodingFilter</filter-name>
    	<url-pattern>/*</url-pattern>
  	</filter-mapping>

  	<servlet>
    	<servlet-name>action</servlet-name>
    	<servlet-class>org.springframework.web.servlet.DispatcherServlet</servlet-class>
    	<init-param>
      		<param-name>contextConfigLocation</param-name>
      		<param-value>/WEB-INF/conf/action-servlet.xml</param-value>
    	</init-param>
    	<load-on-startup>1</load-on-startup>
  	</servlet>
  	<servlet-mapping>
    	<servlet-name>action</servlet-name>
    	<url-pattern>/</url-pattern>
  	</servlet-mapping>
📍 action-servlet.xml(dispatcherServlet.xml)
뷰 리졸버는 컨트롤러에서 데이터를 받은 후 리턴할 때 뷰 이름을 지정해서 리턴해준다.
<bean id="viewResolver" class="org.springframework.web.servlet.view.InternalResourceViewResolver">
		<property name="viewClass">
			<value>org.springframework.web.servlet.view.JstlView</value>
		</property>
		<property name="prefix" value="/browser/" />
		<property name="suffix" value=".jsp" />
</bean>

 <!-- URL Handler Mapping -->
 <bean id="defaultHandlerMapping" class="org.springframework.web.servlet.handler.BeanNameUrlHandlerMapping" />
📍 DataAccessContext.xml
<bean id="dataSource" class="org.apache.commons.dbcp2.BasicDataSource" destroy-method="close">
		<property name="driverClassName" value="${DB.driver}"/>
		<property name="url" value="${DB.url}"/>
		<property name="username" value="${DB.id}"/>
		<property name="password" value="${DB.pw}"/>
		<property name="defaultAutoCommit" value="false"/>
	</bean>

	<bean id="sqlSessionFactory" class="org.mybatis.spring.SqlSessionFactoryBean">
		<property name="dataSource" ref="dataSource"/>
		<property name="configLocation"  value="classpath:/mybatisConfig/mybatisConfiguration.xml"/>
	</bean>
	<bean id="sqlSession" class="org.mybatis.spring.SqlSessionTemplate">
		<constructor-arg index="0" ref="sqlSessionFactory" />
	</bean>
아직 여기서 끝이 아닙니다.
Spring MVC를 사용하기 위한 설정뿐만 아니라 사용해야 할 dependency를 설정해야 하며 호환되는 버전을 선택해야 합니다.
물론 아래의 내용도 일부 중 하나입니다.
   <dependency>
	    <groupId>org.springframework</groupId>
	    <artifactId>spring-context</artifactId>
	    <version>4.2.5.RELEASE</version>
	</dependency>
	<!-- https://mvnrepository.com/artifact/org.springframework/spring-aop -->
	<dependency>
	    <groupId>org.springframework</groupId>
	    <artifactId>spring-aop</artifactId>
	    <version>4.2.5.RELEASE</version>
	</dependency>
	<!-- https://mvnrepository.com/artifact/org.springframework/spring-beans -->
	<dependency>
	    <groupId>org.springframework</groupId>
	    <artifactId>spring-beans</artifactId>
	    <version>4.2.5.RELEASE</version>
	</dependency>
	<!-- https://mvnrepository.com/artifact/org.springframework/spring-core -->
	<dependency>
	    <groupId>org.springframework</groupId>
	    <artifactId>spring-core</artifactId>
	    <version>4.2.5.RELEASE</version>
	</dependency>
	<!-- https://mvnrepository.com/artifact/org.springframework/spring-expression -->
	<dependency>
	    <groupId>org.springframework</groupId>
	    <artifactId>spring-expression</artifactId>
	    <version>4.2.5.RELEASE</version>
	</dependency>
	<!-- https://mvnrepository.com/artifact/org.springframework/spring-instrument -->
	<dependency>
	    <groupId>org.springframework</groupId>
	    <artifactId>spring-instrument</artifactId>
	    <version>4.2.5.RELEASE</version>
	</dependency>
	<!-- https://mvnrepository.com/artifact/org.springframework/spring-jdbc -->
	<dependency>
	    <groupId>org.springframework</groupId>
	    <artifactId>spring-jdbc</artifactId>
	    <version>4.2.5.RELEASE</version>
	</dependency>
	<!-- https://mvnrepository.com/artifact/org.springframework/spring-webmvc -->
	<dependency>
	    <groupId>org.springframework</groupId>
	    <artifactId>spring-webmvc</artifactId>
	    <version>4.2.5.RELEASE</version>
	</dependency>
	<dependency>
	    <groupId>org.springframework</groupId>
	    <artifactId>spring-context-support</artifactId>
	    <version>4.2.5.RELEASE</version>
	</dependency>
이처럼 개발자가 MVC 모델을 기반으로 어플리케이션을 만들려고 할 때 상당히 많은 시간을 환경설정을 위해 투자하게 되고 설정을 제대로 하지 않으면 우리는 404 error를 보게 됩니다🤣
심지어 코딩을 아직 하지도 않았습니다 🤣

✅ 그럼 Spring boot는 어떻게 다를까요??😊

공식 사이트에 이렇게 나와있습니다.
Spring Boot makes it easy to create stand-alone, production-grade Spring based Applications that you can "just run".
눈에 띄는 문장이 보입니다. "단지 실행만 해라"
우리는 단지 실행만 하면 되고 위처럼 설정할 필요를 없게 만든 것이 바로 Spring Boot입니다.👍
✅ Spring Boot Starter
기존에는 스프링을 사용할 때 버전까지 명시하고 버전에 맞는 설정을 하였지만, 스프링 부트는 버전 관리를 스프링 부트에 의해서 관리됩니다. 따라서 아래처럼 spring-boot-starter-web을 사용하면 종속된 모든 라이브러리를 알맞게 찾아서 함께 가져오기 때문에 종속성이나 호환 버전에 대해 신경 쓸 필요가 없게 됩니다.👌
<dependency>
   <groupId>org.springframework.boot</groupId>
   <artifactId>spring-boot-starter-web</artifactId>
</dependency>
spring-boot-starter-web은 다음과 같은 의존성이 추가됩니다.
🔹 starter-web
🔹 starter-webmvc
🔹 spring-boot-starter-tomcat 🔹tomcat-embed-core
🔹tomcat-embed-logging-juli
또한, spring-boot-starter-test를 쓰고 싶다면 아래처럼 추가만 해주면 됩니다. 정말 간편해졌습니다.
<dependency>
   <groupId>org.springframework.boot</groupId>
   <artifactId>spring-boot-starter-web</artifactId>
</dependency>
<dependency>
   <groupId>org.springframework.boot</groupId>
   <artifactId>spring-boot-starter-test</artifactId>
   <scope>test</scope>
</dependency>
✅ Embed Tomcat
스프링 부트는 내장형 톰캣을 가지고 있기 때문에 별도의 톰캣을 설정할 필요가 없어졌으며, 그렇기 때문에 독립적으로 실행 가능한 jar로 손쉽게 배포가 가능해졌습니다.
✅AutoConfigurator
공통적으로 필요한 DispatcherServlet같은 설정을 어노테이션을 이용하여 대신할 수 있도록 해줍니다.
스프링 부트의 main 메서드는 @SpringBootApplication 어노테이션을 가지고 있는데 이것은 ComponentScan + configuraion + EnableAutoConfiguration를 합친 어노테이션 이라볼 수 있습니다.
🎈 참고
[책] 스프링 부트로 배우는 자바 웹 개발
[사이트] Spring vs. Spring Boot